
Hi👋 I’m MARILYN, a 34-year-old from the United Kingdom. Cooking is my passion, and I love sharing delicious, easy-to-follow recipes. Join me on marilynrecipes.com to explore a world of culinary delights, from comforting classics to innovative creations. Let’s make cooking fun and enjoyable for everyone! Cooking is about more than just food it’s about sharing stories and making memories.
I remember the first time I made protein balls like this. It was a rainy Sunday afternoon, and I had my kitchen full of almonds, oats, peanut butter, and chocolate chips. My kids were running around, curious about what I was mixing, and my husband was peeking over my shoulder, asking if he could “sample just one.” That day, I realized cooking isn’t just about meals; it’s about bringing little joys into our daily lives.
Protein balls meal prep storage tips are something every busy woman or mom needs in her life. These little snacks are perfect for keeping energy levels up, especially when you’re juggling work, school runs, or just life in general. The beauty of protein balls is that they are simple, nutritious, and versatile. You can change the flavors depending on your mood or what’s in your pantry. And knowing how to store them properly ensures that every bite is just as delicious as the day you made them.
Why I Love Making Protein Balls
I make protein balls not just because they are quick and healthy, but because they feel like a warm hug in snack form. There’s something comforting about rolling little balls of goodness in your hands, shaping them with love, and knowing they’ll be a source of nourishment later. I’ve made them with chocolate chips, dried fruit, coconut flakes, or even a touch of cinnamon. Every version reminds me of my childhood afternoons when my mom used to bake little treats, and we’d sneak them from the cookie jar when no one was looking.
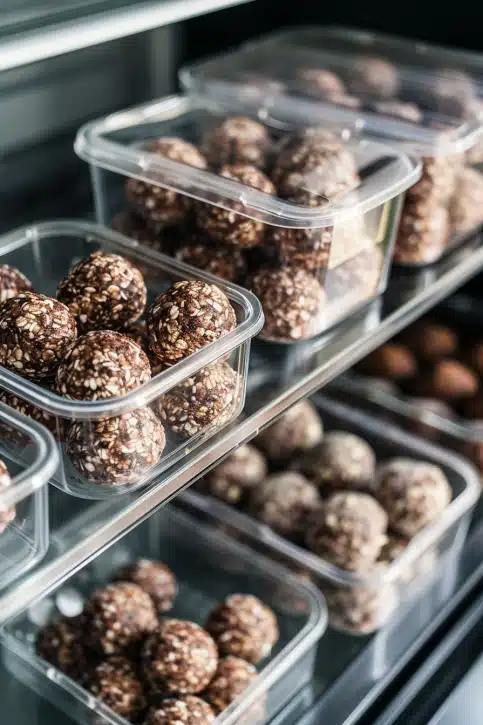
Protein balls meal prep storage tips are crucial because they can stay fresh and tasty for days, even weeks, if you handle them correctly. I always make a big batch at the start of the week, then store them in glass containers or freezer bags so I can grab one whenever I need a pick-me-up. They’ve become a little ritual in my house every morning, my kids reach for one before school, and I often have one with my afternoon tea.
Ingredients & Little Kitchen Secrets
Here’s what I usually keep on hand for my protein balls. These ingredients are flexible, and you can swap a few depending on your taste or pantry staples:
- 1 cup rolled oats
- ½ cup natural peanut butter (or almond butter)
- ¼ cup honey or maple syrup
- ½ cup chocolate chips (dark or milk chocolate)
- ¼ cup chia seeds or flax seeds
- 1 teaspoon vanilla extract
- Pinch of salt
Little kitchen secrets:
- Toast your oats lightly in a dry pan to bring out a nutty flavor.
- Use natural nut butter it keeps the protein balls less sweet and more wholesome.
- If the mixture feels too sticky, chill it in the fridge for 15–20 minutes before rolling.
- Roll balls in desiccated coconut, cocoa powder, or crushed nuts for extra texture.
How I Make Protein Balls, Step by Step
- In a large mixing bowl, I combine the peanut butter, honey, and vanilla extract until smooth. I love the sweet aroma that fills the kitchen at this stage it’s like an instant cozy hug.
- I add the oats, chia seeds, and salt to the wet mixture. I stir gently but thoroughly so every oat is coated in the peanut butter goodness.
- Chocolate chips come next. I fold them in carefully so they stay whole no one wants melted chocolate everywhere at this point!
- I chill the mixture in the fridge for 15–20 minutes. This makes rolling easier and ensures my protein balls hold their shape.
- Once firm, I scoop about a tablespoon of the mixture and roll it between my palms. I love this step; it’s therapeutic, and sometimes my kids join in, making little balls of fun.
- I repeat until all the mixture is used. You should get about 15–18 balls depending on size.
- Optional: Roll the balls in coconut flakes, cocoa powder, or crushed nuts for a decorative, tasty coating.
How I Serve Protein Balls at Home
I usually serve them in a small glass jar on the counter, so anyone can grab one when they need a boost. They pair beautifully with a cup of coffee or tea, or a smoothie for a post-workout snack. Sometimes I pack them in little containers for school lunches or my own workday. Seeing my kids’ eyes light up when they find these little treasures is priceless.
Protein balls meal prep storage tips are essential here: I always label my containers with the date I made them, so I know exactly how long they’ve been around. This helps me keep everything fresh and delicious, avoiding any “forgotten snacks” at the back of the fridge.
Storage, Reheating & Make-Ahead Tips
Fridge: Protein balls last about 5–7 days in an airtight container. I love how convenient this is I can make them on Sunday, and they’ll be ready for the whole week.
Freezer: For longer storage, I freeze protein balls for up to 3 months. I lay them on a baking tray, freeze individually, then transfer them to a freezer bag. When I want one, I just pop it out and let it thaw for 10–15 minutes. It’s like magic!
Room temperature: If you plan to eat them within 2–3 days, keeping them in a sealed jar at room temperature is fine. Just make sure they’re away from heat or sunlight.
Make-Ahead Tip: I sometimes double the batch and roll half in cocoa powder and half in coconut. It’s a fun way to add variety without any extra cooking.
Bonus Tip: If your protein balls dry out slightly in the fridge, I brush them lightly with a bit of honey to bring back softness.
100-Word Short Version
Protein balls are my go-to snack for busy mornings or post-workout energy boosts. I mix oats, peanut butter, honey, chia seeds, and chocolate chips, chill the mixture, then roll into little balls. Store them in an airtight container in the fridge for up to a week, or freeze for months. Rolling them in cocoa powder, coconut, or crushed nuts adds extra flavor and texture. These protein balls are healthy, simple, and full of love. They’re perfect for meal prep and keeping energy levels high. Every batch brings comfort and a little joy to my kitchen.
Recipe Card Section
⏱️ Time
- Prep: 15 minutes
- Chill: 20 minutes
- Total: 35 minutes
🛒 Ingredients
- 1 cup rolled oats
- ½ cup natural peanut butter
- ¼ cup honey or maple syrup
- ½ cup chocolate chips
- ¼ cup chia seeds or flax seeds
- 1 teaspoon vanilla extract
- Pinch of salt
👩🍳 Instructions
- Mix peanut butter, honey, and vanilla extract until smooth.
- Add oats, chia seeds, and salt, mixing thoroughly.
- Fold in chocolate chips.
- Chill mixture in fridge for 15–20 minutes.
- Scoop tablespoon-sized portions and roll into balls.
- Optional: Coat with coconut, cocoa, or crushed nuts.
📝 Notes
- Toast oats for extra flavor.
- Use natural nut butter for a wholesome snack.
- Freeze for up to 3 months for long-term storage.
- Adjust sweetness with honey or maple syrup.
🍽️ Nutrition (per ball, approx.)
Calories: 120
Protein: 4g
Carbs: 12g
Fat: 7g
Fiber: 2g
Sugar: 6g
Protein Balls Meal Prep Storage Tips
- Prep Time: 15 minutes
- Cook Time: 0 minutes
- Total Time: 35 minutes
- Yield: 15–18 balls 1x
- Category: Snack
- Method: No-Bake
- Cuisine: British
- Diet: Vegetarian
Description
These protein balls are a perfect snack for busy mornings, post-workout energy boosts, or quick grab-and-go moments. Packed with oats, peanut butter, honey, and chocolate chips, they are healthy, simple, and full of love. Follow my protein balls meal prep storage tips to keep them fresh and delicious all week long.
Ingredients
- 1 cup rolled oats
- ½ cup natural peanut butter
- ¼ cup honey or maple syrup
- ½ cup chocolate chips
- ¼ cup chia seeds or flax seeds
- 1 teaspoon vanilla extract
- Pinch of salt
Instructions
- Mix peanut butter, honey, and vanilla extract until smooth.
- Add oats, chia seeds, and salt, mixing thoroughly.
- Fold in chocolate chips.
- Chill mixture in fridge for 15–20 minutes.
- Scoop tablespoon-sized portions and roll into balls.
- Optional: Coat with coconut, cocoa, or crushed nuts.
Notes
Toast oats for extra flavor. Use natural nut butter for a wholesome snack. Freeze for up to 3 months for long-term storage. Adjust sweetness with honey or maple syrup.
Nutrition
- Serving Size: 1 ball
- Calories: 120
- Sugar: 6g
- Sodium: 30mg
- Fat: 7g
- Saturated Fat: 1g
- Unsaturated Fat: 6g
- Trans Fat: 0g
- Carbohydrates: 12g
- Fiber: 2g
- Protein: 4g
- Cholesterol: 0mg
Conclusion
Making protein balls is more than just creating a snack it’s about creating moments in my kitchen with my family. Rolling, mixing, and tasting together has become a little ritual that brings us closer. Knowing how to store them properly ensures that every bite is fresh, delicious, and full of love. Protein balls meal prep storage tips make life easier, help us stay energized, and bring joy to simple moments. Every batch is a reminder that cooking is about more than food it’s about memories, comfort, and a little sweetness in our day.